
AdGuard Home on Raspberry Pi: why I use it on my home network
The first version of this guide still had Raspberry Pi prices from 2021, an installation command based on curl | sh, and – the first thing I would change today – a suggestion to expose the AdGuard Home admin panel to the Internet by forwarding port 3000. AdGuard Home has changed since then, so has the way I use it, and the price and value of different boards look completely different today. Rather than adding more patches to the old article, it made more sense to rewrite it.
The goal is still the same: I want one place on my home network that filters DNS for phones, computers, TVs, and other devices. No separate ad blocker on every client. On top of that I get Safe Search, security lists, some telemetry blocking, and a very useful Query Log when I need to understand why an app suddenly stopped working.
AdGuard Home is exactly that kind of local DNS server. This guide shows my current setup: AdGuard Home on Raspberry Pi with Docker. The same server can also run on a regular Linux host, a NAS, or another machine with Docker. Raspberry Pi is still convenient because it can run 24/7 without needing much power or hardware.
What AdGuard Home can do – and what it cannot
It is easy to expect too much here: AdGuard Home filters at the DNS level. If an app tries to connect to a domain that is on a blocking list, the local DNS server can block that domain before the device connects to it.
That works well for many advertising networks, trackers, telemetry domains, phishing destinations, and parts of malware infrastructure. It is not an antivirus product and does not replace endpoint protection. It also cannot remove every ad. If a service delivers ads from the same domain as its normal content, blocking that domain would break the service itself. That is why directly embedded ads on some video platforms are a different problem from classic ad trackers.
This matters when choosing filter lists. More rules do not automatically mean better protection. Sometimes they simply mean more things to troubleshoot later.
What hardware should you choose?
AdGuard Home does not need a powerful computer. For a lightweight dedicated installation, 1 GB of RAM can still be enough. If I were buying hardware specifically for DNS today, though, I would choose 2 GB. Not because AdGuard itself is particularly heavy, but because larger filter lists, Docker, and updates tend to accumulate over time. My current setup already has millions of rules, and in that scenario I would not design a new device with almost no headroom.
Affiliate disclosure: some of the hardware links below are Amazon affiliate links. As an Amazon Associate I earn from qualifying purchases. Using one of these links does not cost you anything extra. I only link products that fit the setup described here; I am not claiming that I personally tested every specific product listed.
The easiest option: a Raspberry Pi 4 2 GB kit
If you do not want to buy every part separately, a complete Raspberry Pi 4 2 GB kit is the simplest path. Two examples are db-tronic kits: a red-and-white 2 GB / 64 GB kit and a black 2 GB / 64 GB kit. Both include the board, a 15 W power supply, case, heatsinks, 64 GB card, and a micro-HDMI cable.
A headless AdGuard Home server does not need the HDMI cable, so in a kit it simply becomes a spare. The storage card matters more: the included 64 GB card is not described as a High Endurance model, so I would not treat it as equivalent to a card designed specifically for long-running workloads with frequent writes.
The setup I would choose for 24/7 use
If you prefer to build the system yourself, my sensible starting point is a Raspberry Pi 4 Model B 2 GB, the official USB-C power supply, 5.1 V / 3 A, a Miuzei passive aluminium case, and a SanDisk High Endurance 64 GB. For a DNS appliance used by the whole network, I prefer Ethernet to Wi-Fi. If you need a short patch cable, one example is a PremiumCord Cat6a 1.5 m cable.
Cat6a is not a requirement here. Raspberry Pi 4 has Gigabit Ethernet, and a good Cat5e cable is perfectly adequate. I mention this specific cable because it is short, shielded, and made of copper – not because AdGuard needs Cat6a.
Orange Pi Zero3 as an alternative
AdGuard Home is not tied to Raspberry Pi. It can run on other small ARM computers too. One alternative is the Orange Pi Zero3 2 GB. Technically it is very capable for this job, but I do not assume it will always be cheaper than Raspberry Pi. If both options cost roughly the same on the day you buy them, I would steer a beginner toward Raspberry Pi because of the more predictable ecosystem, documentation, and availability of established guides.
You can pair the Orange Pi with a passive aluminium heatsink/case and a USB-C 5 V / 3 A power supply. The 1.5 GB model exists and has enough RAM for a typical AdGuard Home workload, but it currently has known issues around that specific memory configuration in bootloaders and operating systems, so I would not recommend it as the first choice for a beginner.
What about prices?
The old version of this article included a table with exact prices. I deliberately left that out this time. Electronics and marketplace offers change too quickly, and with Amazon affiliate links I do not want to copy prices into the article manually only for them to be wrong a few weeks later. The current price is best checked on the product page itself.
The same applies to electricity cost. Rather than giving everyone one number, the honest approach is to measure your own setup with a power meter and calculate: (W / 1000) × 24 × 365 × price per kWh. For a machine running 24/7, that measurement is more useful than the rating printed on the power supply.
Preparing Raspberry Pi without a monitor
I do not need a desktop, monitor, or keyboard for a DNS server. I set it up headless. Raspberry Pi officially recommends Raspberry Pi Imager for this because you can define the hostname, user account, network settings, and SSH before the first boot.
In Raspberry Pi Imager I choose Raspberry Pi OS Lite (64-bit). In August 2026, Raspberry Pi OS 64-bit is based on Debian 13 (Trixie), and Raspberry Pi 4 is supported. In the image settings I assign a hostname, create a user with a password, and enable SSH. If the device will use Ethernet – which is what I prefer for a home DNS server – there is no need to configure Wi-Fi.
After writing the card, I insert it into the Raspberry Pi, connect Ethernet and power, and let it boot. I then connect over SSH using the hostname configured in Imager or the address shown by the router:
ssh USER@HOSTNAME.local
I begin by updating the system:
sudo apt update
sudo apt full-upgrade -y
sudo reboot
After the reboot I connect again over SSH.
Docker Engine and Compose
I am not using the old pattern of downloading a script from the Internet and piping it straight into the shell. Docker provides an official APT repository for Debian, and that is a much clearer approach for 64-bit Raspberry Pi OS based on Debian as well.
sudo apt update
sudo apt install -y ca-certificates curl

sudo install -m 0755 -d /etc/apt/keyrings
sudo curl -fsSL https://download.docker.com/linux/debian/gpg \
  -o /etc/apt/keyrings/docker.asc
sudo chmod a+r /etc/apt/keyrings/docker.asc

sudo tee /etc/apt/sources.list.d/docker.sources >/dev/null <<EOF
Types: deb
URIs: https://download.docker.com/linux/debian
Suites: $(. /etc/os-release && echo "$VERSION_CODENAME")
Components: stable
Architectures: $(dpkg --print-architecture)
Signed-By: /etc/apt/keyrings/docker.asc
EOF

sudo apt update
sudo apt install -y docker-ce docker-ce-cli containerd.io \
  docker-buildx-plugin docker-compose-plugin
I verify that Docker and Compose work:
sudo docker run --rm hello-world
sudo docker compose version
You can configure Docker to run without sudo later if you want. It is not required for AdGuard Home itself, so this guide keeps the commands explicit and uses sudo.
Installing AdGuard Home with Docker Compose
First I create a working directory:
mkdir -p ~/docker/adguard
cd ~/docker/adguard
mkdir -p adguard/conf adguard/work
Then I create compose.yml:
services:
  adguard:
    image: adguard/adguardhome:latest
    container_name: adguard
    restart: unless-stopped

    ports:
      - "53:53/tcp"
      - "53:53/udp"

      # Web interface after initial configuration
      - "12280:80/tcp"

      # Only for the first-run setup wizard
      - "3000:3000/tcp"

    volumes:
      - ./adguard/conf:/opt/adguardhome/conf
      - ./adguard/work:/opt/adguardhome/work
Start it:
sudo docker compose up -d
A note about exposed ports: the ports: section publishes ports on the host interfaces. In a typical home network behind NAT this is not the same as forwarding those ports from the Internet, but Docker itself should not be treated as a firewall. If the host has multiple interfaces, a publicly reachable IPv6 address, or more complex network segmentation, restrict access to the admin interface to trusted networks and review the firewall and Docker DOCKER-USER rules.
The official AdGuard Home documentation uses TCP 3000 for initial setup, TCP 80 for the web interface, and TCP/UDP 53 for regular DNS. I deliberately do not expose DHCP, DoT, DoQ, DNSCrypt, or a DoH server in this example because I do not need them here.
Important: do not forward port 3000 from the Internet to the Raspberry Pi. The setup wizard and the later admin interface should be available from the local network. If you ever need remote administration, a VPN or a properly secured reverse proxy is a much better solution.
First launch
After the container starts, I open:
http://SERVER-IP:3000
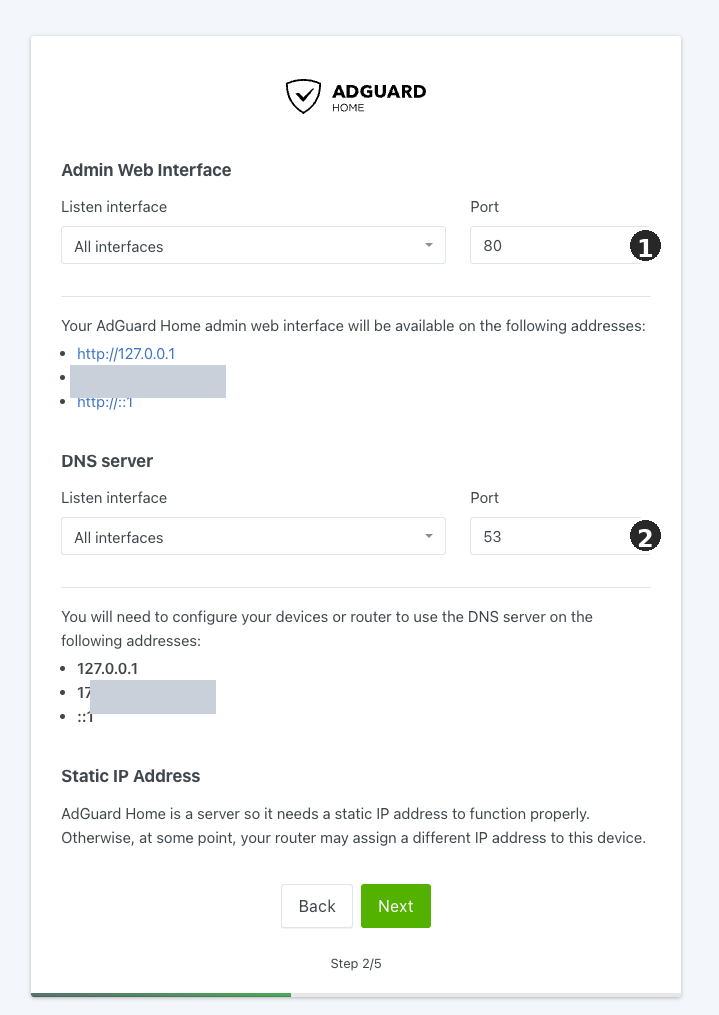
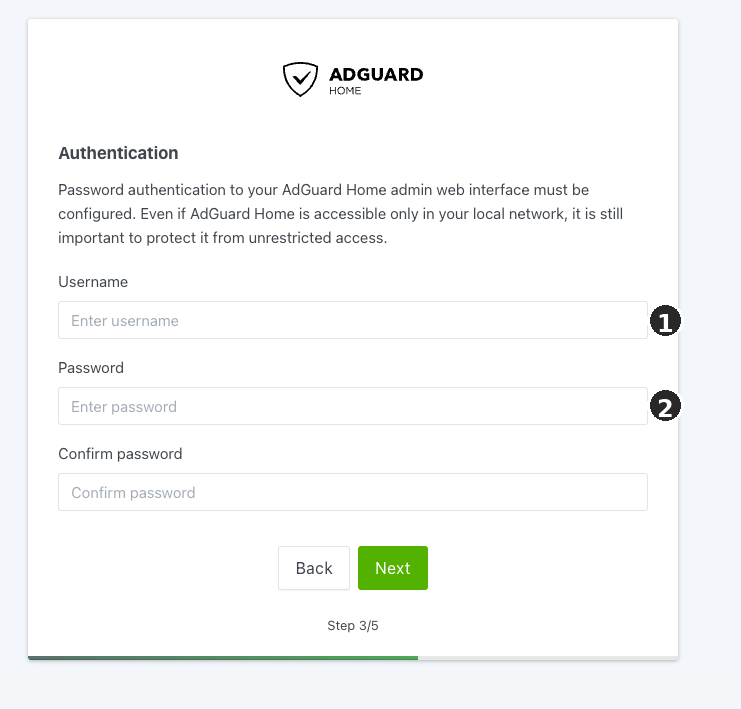
In the wizard I set the web interface to port 80 and DNS to port 53. I also create a separate administrator account. After the wizard is complete, the panel is available through the host port defined in Compose, which in this example is:
http://SERVER-IP:12280
Once everything works, I remove the temporary line from compose.yml:
- "3000:3000/tcp"
and recreate the container:
sudo docker compose up -d
This sounds minor, but it makes the configuration much easier to understand months later. The Compose file keeps only the ports that are actually needed, so I do not have to remember why 853, 784, or 3000 was once exposed.
Give AdGuard a stable LAN address first
A DNS server should not receive a different address after a router reboot. The simplest solution is a DHCP reservation in the router for the Raspberry Pi Ethernet interface, for example 192.168.1.10. I prefer a DHCP reservation to manually configuring a static address on the host because all address management remains in one place.
After saving the reservation, check in the router or with ip addr that the device really received the expected address. Only then use that address as DNS for clients.
Using AdGuard Home as DNS for the network
The easiest approach is to configure the AdGuard Home host address as the DNS server distributed by the router or DHCP server. Phones, laptops, TVs, and most other devices will then start using it automatically.
Do not add a public resolver such as 1.1.1.1 or 8.8.8.8 next to AdGuard as a “backup DNS” if consistent filtering matters to you. A client is not required to treat the second address as emergency-only and may send some queries around AdGuard Home. If you need real redundancy, a second local resolver is the cleaner design.
If IPv6 is enabled on your LAN, also check which DNS server the router advertises over IPv6. A correct IPv4 setup does not help if devices also receive an external IPv6 resolver from the router or ISP and choose that instead.
I do not forward port 53 from the WAN into the LAN. This DNS server is for my local network, not a public resolver exposed to the Internet.
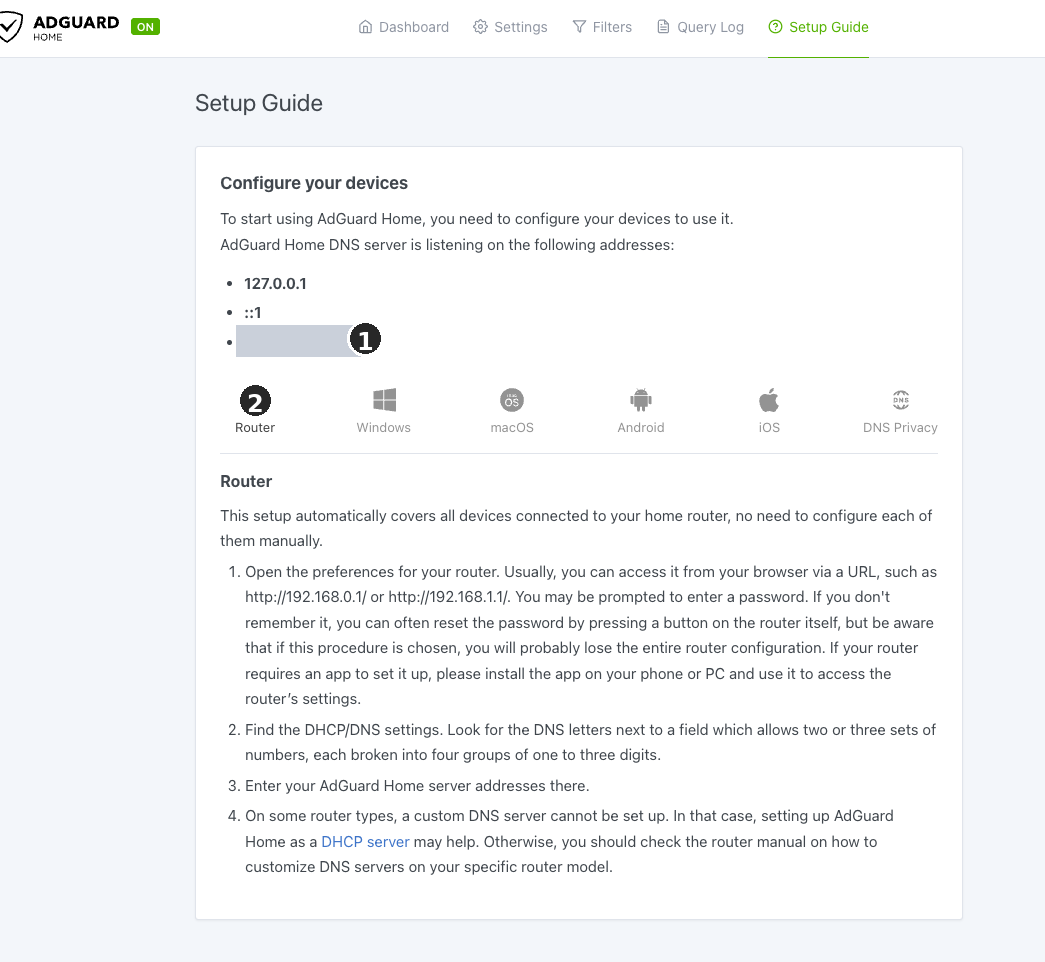
After making the change I run one simple test from any client so I do not have to guess whether DNS is really reaching AdGuard Home:
dig @ADGUARD-IP example.com +stats
If the query appears in the Query Log, the client → AdGuard Home path works.
Upstream DNS: two encrypted resolvers instead of a long list
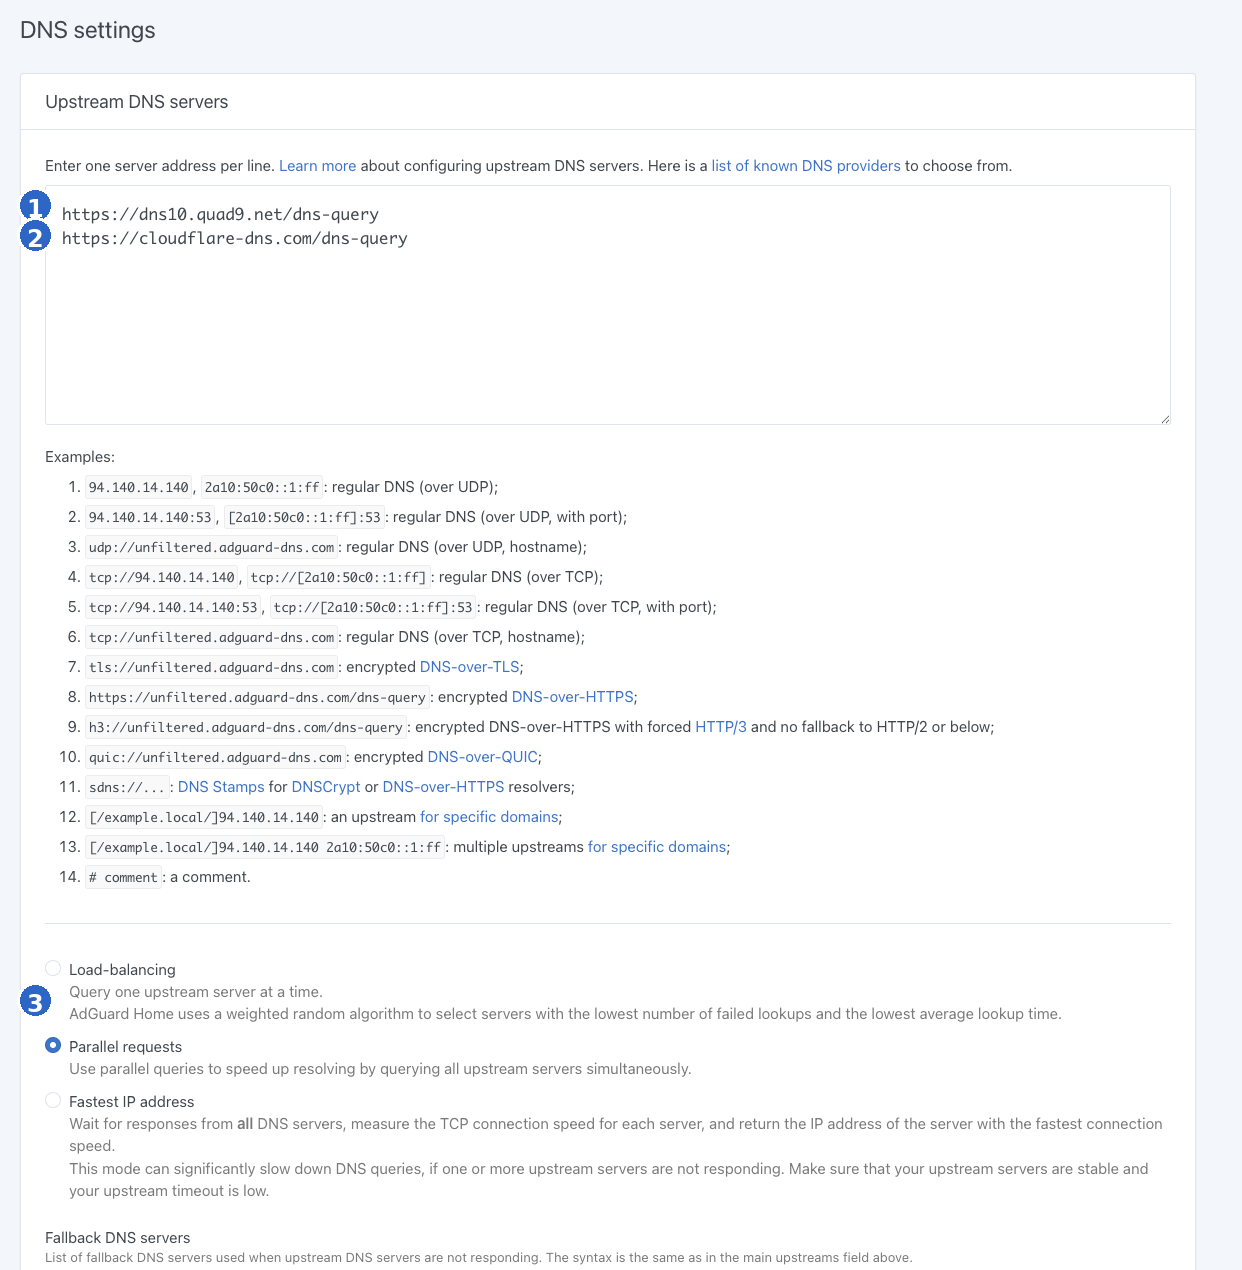
For a while I had several different upstream resolvers configured. It looked good in theory, but with Load-balancing I occasionally noticed much slower responses. I eventually simplified the setup to two DoH resolvers and kept Parallel requests.
https://dns10.quad9.net/dns-query
https://cloudflare-dns.com/dns-query
With Parallel requests, when an answer is not already in the local cache, AdGuard sends the query to both configured upstreams and uses the first reply. That can reduce latency, but it has an obvious privacy cost: both resolvers see the query. With eight upstreams that trade-off stopped making sense to me; with two it is deliberate and easy to understand.
I chose Quad9 dns10 here, which is the option without Quad9’s additional threat filtering. Since June 2026 Quad9 also validates DNSSEC on these endpoints, so “no threat blocking” no longer means “no DNSSEC”. I want blocking to happen in one place – locally in AdGuard Home – instead of later having to work out whether a domain was blocked by my filters, Quad9, or another layer.
Bootstrap DNS can stay simple, for example:
9.9.9.10
1.1.1.1
Blocklists: broad coverage, but with a plan
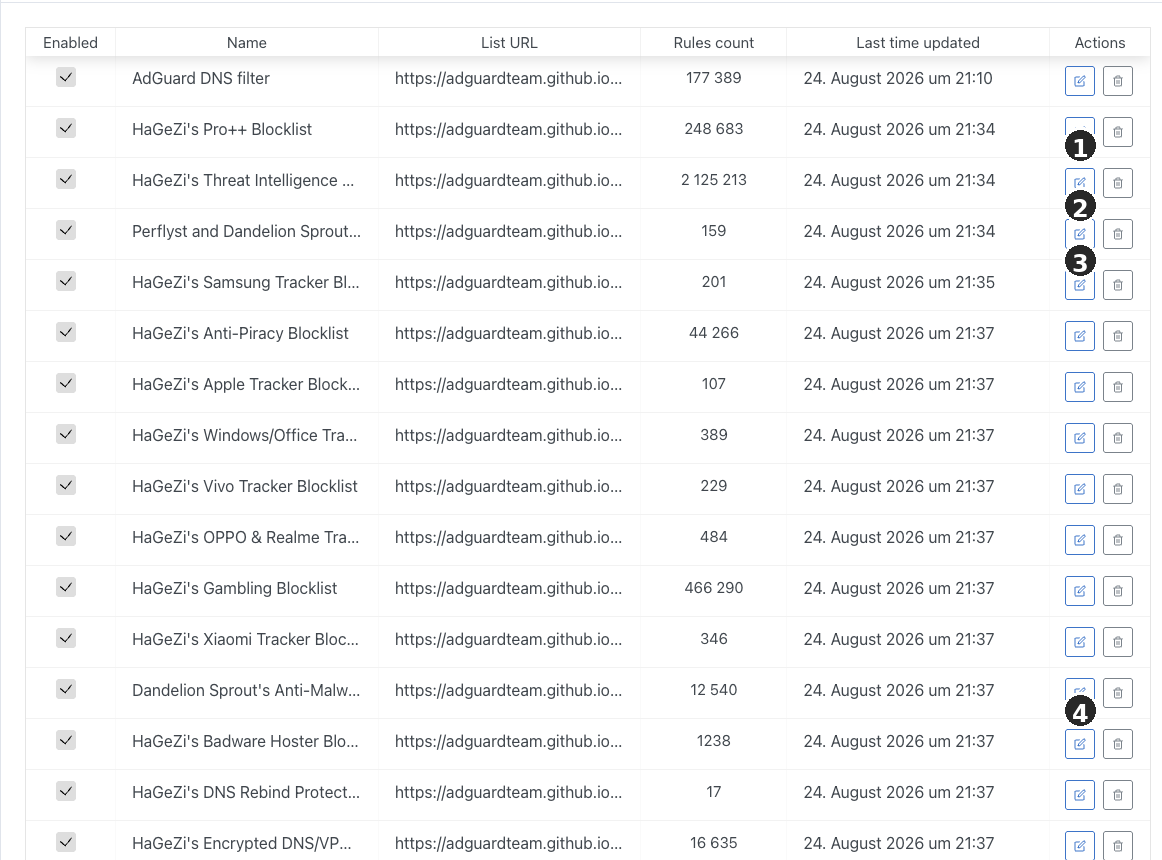
It is very easy to overdo blocklists. My network does not consist only of a few browsers. There are Apple devices, Smart TVs, international services, and apps that can be fairly chatty. That is why I prefer a broader profile than the absolute minimum.
At the same time, I noticed how easy it is to end up with several lists that do almost the same thing. I removed overlaps and kept layers with a clear purpose. A sensible starting point looks like this:
- HaGeZi Pro++ as a broad main list for ads, trackers, and telemetry;
- HaGeZi Threat Intelligence Feeds as a separate threat layer;
- Dandelion Sprout’s Anti-Malware List as an additional security list;
- Smart-TV Blocklist if you have TVs on the network and want to reduce some advertising and telemetry traffic;
- optional vendor-specific or regional lists only when you have an actual reason to use them.
I would not blindly copy my entire list. Aggressive filters, lists of whole suspicious TLDs, or blocking VPN/proxy infrastructure may be excellent in one network and extremely annoying in another. The important part is knowing why each list is enabled.
Safe Search and a few settings that make sense for me
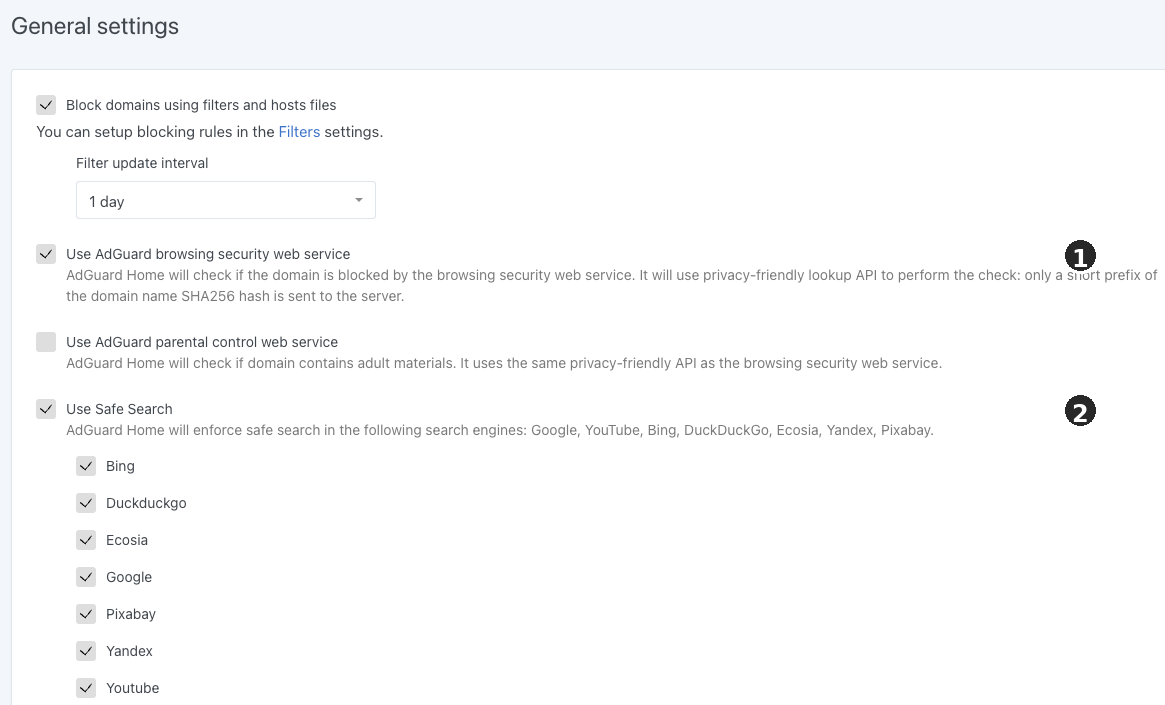
I enable Safe Search globally for the supported search engines and YouTube. I do not treat that as “parental control solved with one checkbox”, but it is a useful additional layer on a family network.
I also keep AdGuard Browsing Security enabled. I do not use the global Parental Control option. If I ever need stricter rules for one device, I would rather configure them per client than change the behavior of the entire network.
After reviewing the setup I also configured:
- filter updates every day;
- Query Log retention of 7 days instead of 90;
- statistics retention of 30 days instead of 24 hours;
- 16 MiB DNS cache;
- Optimistic caching enabled;
- DNSSEC enabled;
- EDNS Client Subnet disabled.
I keep client addresses visible in the Query Log because when I troubleshoot per-client rules I want to know which device made the request. Publication screenshots are different, of course – private addresses there should be anonymized.
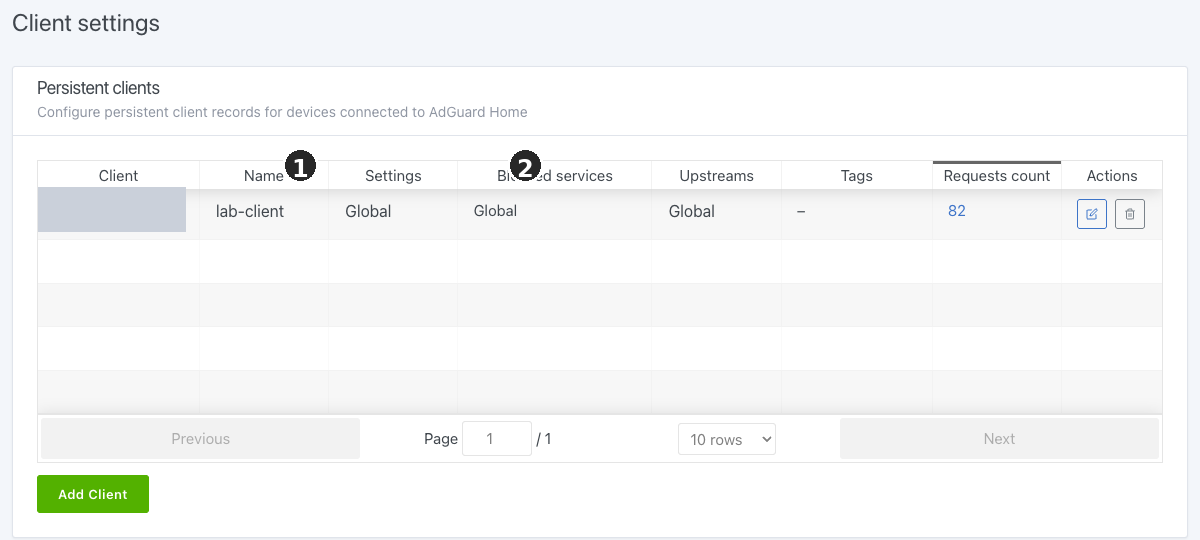
If you want cleaner logs or different rules for selected devices, Persistent clients are useful. You can give a device a name and later configure things such as Safe Search, logging, or other rules per client. It is not required for ordinary DNS blocking, so I would not make a first installation more complicated than necessary.
Blocked Services: the full list available in the current UI
AdGuard Home can block entire services globally or only for a specific client. I leave global Blocked Services disabled in this setup — I do not want to block a service simply because there is a switch for it. If I ever need that policy for one device, I start with a single persistent client rather than changing the whole network.
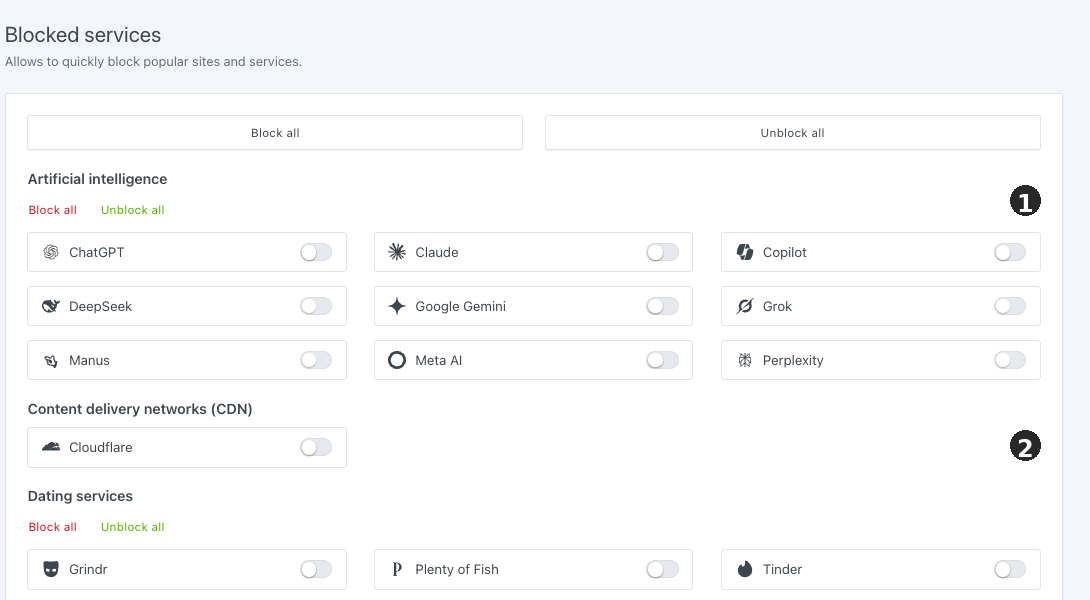
Show the full list: 139 services in 12 categories
This is a snapshot of the current AdGuard Home UI as of 25 August 2026. The list may change in later AdGuard Home releases. Service names are kept exactly as shown in the interface.
- Artificial intelligence: ChatGPT, Claude, Copilot, DeepSeek, Google Gemini, Grok, Manus, Meta AI, Perplexity
- Content delivery networks (CDN): Cloudflare
- Dating services: Grindr, Plenty of Fish, Tinder, Wizz
- Gambling and betting: Betano, Betfair, Betway, Blaze, FDJ United
- Gaming: Activision Blizzard, Battle.net, Blizzard Entertainment, Electronic Arts, Epic Games, GOG, IO Interactive, League of Legends, Minecraft, Nintendo, Origin, PlayStation, Riot Games, Roblox, Rockstar Games, Shell Shockers, Steam, Ubisoft, Valorant, Wargaming, Warner Bros. Games, Xbox Live
- Web hosting: Box, Dropbox, Flickr, Imgur
- Messaging services: KakaoTalk, Kik, MAX, Microsoft Teams, Olvid, Signal, Skype, Slack, Telegram (Web), Viber, WeChat, WhatsApp
- Privacy tools: iCloud Private Relay, Privacy, Proton
- Shopping: AliExpress, Amazon, CoolApk, eBay, Lazada, Mercado Libre, Shein, Shopee, Temu, Xiaohongshu
- Social networks: 4chan, 500px, 9GAG, Amino, Bluesky, Clubhouse, Discord, Douban, Facebook, Instagram, KOOK, LINE, LinkedIn, Mail.ru, Mastodon, Odysee, OK.ru, OnlyFans, Pinterest, Reddit, Snapchat, TikTok, Tumblr, X (formerly Twitter), VK.com, Zhihu
- Software development: Nvidia, Google Play Store
- Streaming services: Amazon Streaming, Apple Streaming, Bigo Live, Bilibili, Canais Globo, Claro, Crunchyroll, Dailymotion, Deezer, DirecTV Go, Discovery+, Disney+, ESPN, FIFA, Globoplay, HBO Max, Hulu, iHeartRadio, iQIYI, Lionsgate+, Looke, Nebula, Netflix, Paramount Plus, Peacock TV, Plex, Pluto TV, QQ, Rakuten Viki, Samsung TV Plus, SoundCloud, Spotify, Spotify Video, Tidal, Twitch, Vimeo, Vivo Play, Voot, Weibo, YouTube, YY
Custom filtering rules: the easiest place to make an exception too broad
This was one of the most useful lessons while cleaning up my configuration.
I wanted to verify that googleads.g.doubleclick.net was being blocked. The query resolved normally even though my active lists should have blocked it. The problem was not HaGeZi or the upstream resolvers. A few months earlier I had added my own exceptions:
@@||googleads.g.doubleclick.net^
@@||doubleclick.net^
The second rule was especially broad because the exception for doubleclick.net also covered its subdomains. I commented out both lines instead of deleting them so I would have an easy rollback if something broke. After that change, the same test returned:
googleads.g.doubleclick.net. 10 IN A 0.0.0.0
The filters had been working all along. My own allowlist was bypassing them.
Since then, when filtering behaves unexpectedly, I start with the Query Log and my own exceptions. A blocklist can be perfect, but one old @@ rule can change the result for an entire domain tree.
I also do not remove every exception automatically. Some were created for a real reason – for example because of Apple services or VPN problems. If a service works reliably because of a deliberate exception, I prefer a documented compromise to a “perfectly clean” configuration that breaks things I actually use.
How I verify that blocking really works
I do not use a random real advertising domain for testing. It may not be on the current list, or it may have its own exception. A more reliable test is to add a temporary neutral rule:
||ads.example.com^
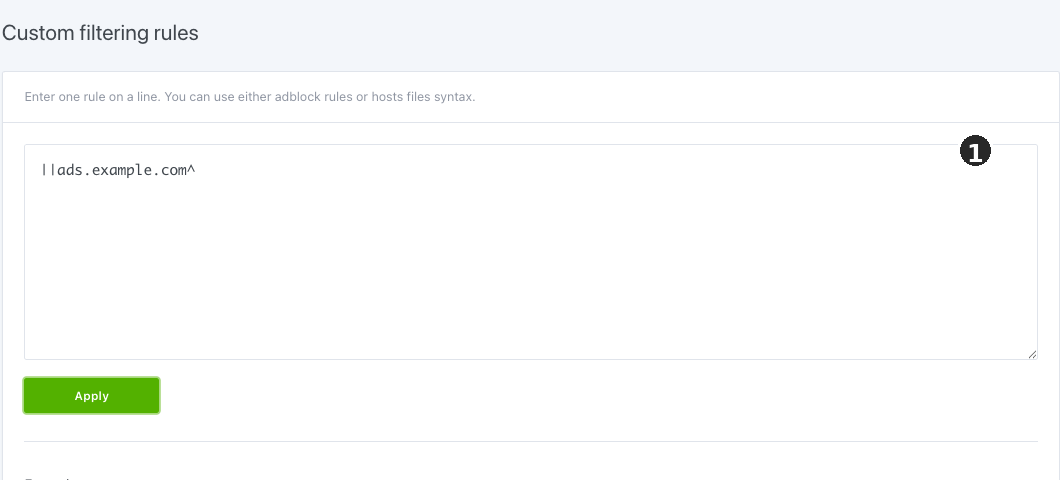
and query my own AdGuard server:
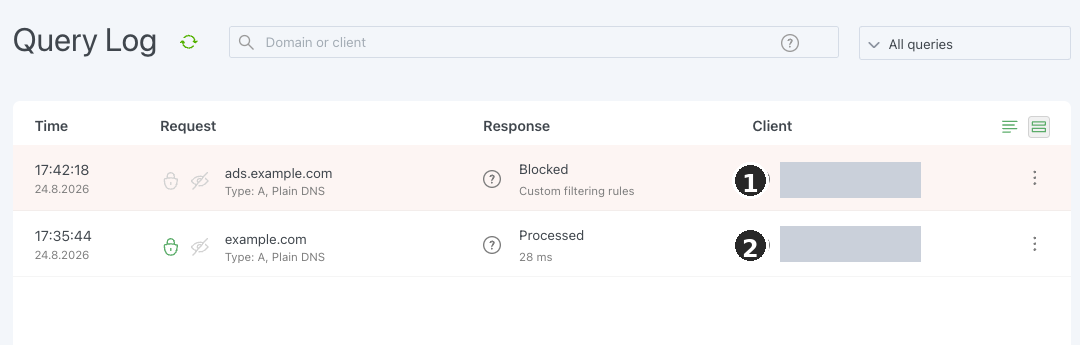
dig @ADGUARD-IP ads.example.com +stats
With the default blocking behavior for an A record, you should see 0.0.0.0. Then the test rule can be removed.
I separately test a normal domain:
dig @ADGUARD-IP example.com +stats
In my test, ordinary DNS queries and blocking both worked correctly after changing the upstreams. Some local responses were reported by dig as 0 ms. That is consistent with a very fast local or cached response, but the timing alone does not prove exactly where the answer came from.
When every device in Query Log looks like one client
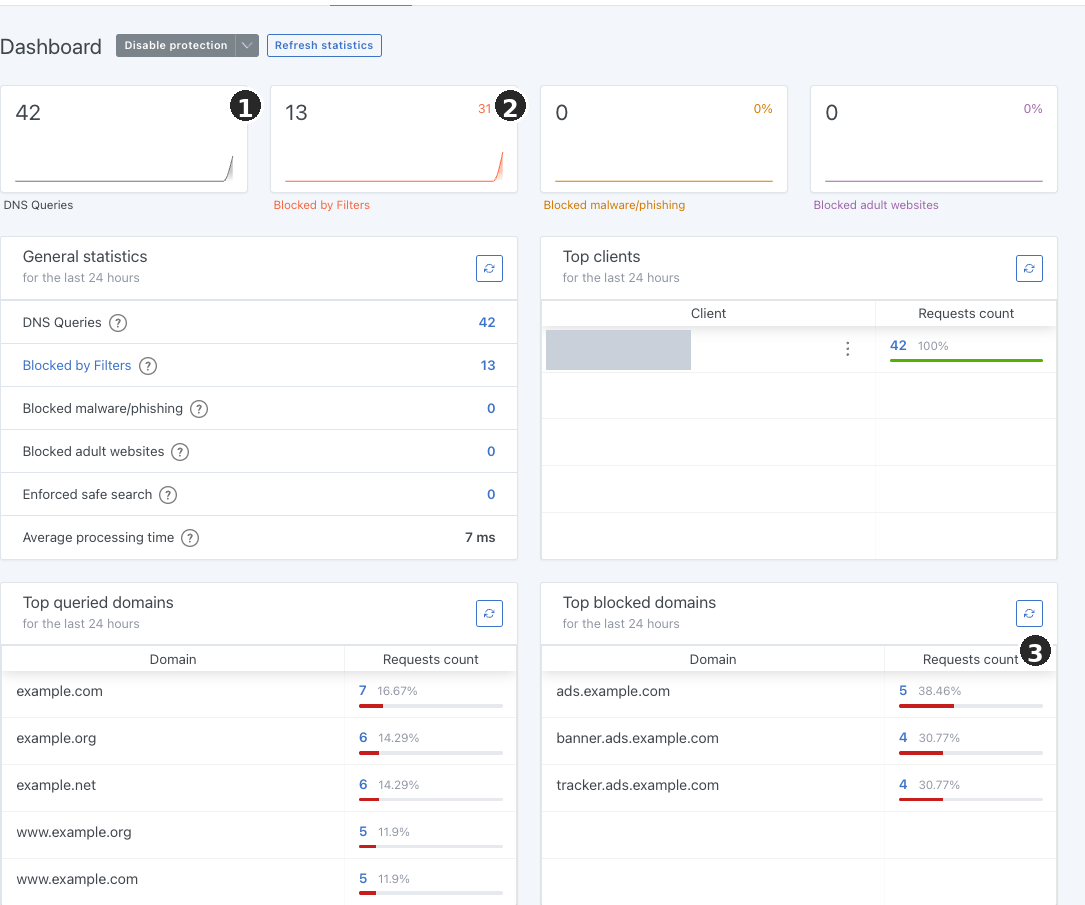
Docker can hide the original client address behind the bridge address. If the Query Log shows the Docker gateway over and over instead of your laptop, phone, and TV, that is not a filtering problem. It is a source-IP visibility problem.
The official AdGuard Home documentation suggests host networking on Linux if preserving original client addresses matters to you. I would not change the network mode of a working installation just because the documentation mentions it, though. With host networking, the container uses the host network directly, so ports: mappings are unnecessary, and any service already listening on port 53 becomes an obvious conflict.
If your current setup already shows clients correctly, leave it alone.
What if port 53 is already in use?
This is fairly common on Linux. Before disabling random services, check what is actually listening:
sudo ss -lntup | grep ':53'
On some distributions systemd-resolved may be using the port. AdGuard has a separate documented procedure for that situation. Treat the change carefully because modifying the local resolver affects DNS for the entire host.
Updates: why I use latest in the example
My Compose file uses:
image: adguard/adguardhome:latest
The reason is simple: this article will not be updated for every AdGuard Home release. The official Docker documentation describes the default image as the latest stable version. That means someone reading the guide six months later does not automatically start with a version number that was only current on publication day.
If you prefer full control over updates, pin a specific tag instead of latest. Current stable versions are listed on the official AdGuard Home Releases page. Make sure you choose a stable release rather than a beta marked as a pre-release.
A new image appearing does not update an existing container by itself. I update deliberately:
sudo docker compose pull
sudo docker compose up -d
Before major changes I back up the conf and work directories and keep the previous compose.yml. That is enough for a quick rollback of many configuration changes. For image updates I also note the previous version or tag when I want an easy path back.
Installing without Docker
Docker is the main path in this guide, but it is not mandatory. AdGuard Home publishes ready-made archives for supported systems. For a native installation, download the package for your architecture from the official releases page, extract it, and register the program as a service.
After entering the extracted AdGuardHome directory, the official installation command is:
sudo ./AdGuardHome -s install
You can check the service later with:
sudo ./AdGuardHome -s status
On first launch AdGuard Home listens on port 3000 and presents the same setup wizard. Current stable archives are available on the official Releases page, and the complete installation process is documented in Getting started.
I do not use a command like curl ... | sh as the default installation method here. Downloading a specific release and running an explicit binary is simply easier to inspect and reproduce later.
Limitations worth knowing in advance
First, DNS-level blocking does not replace a browser ad blocker. It is excellent for devices where you cannot install an extension – TVs, some mobile apps, or IoT hardware – but it will not solve every kind of advertising.
Second, not every device has to respect the DNS server handed out by the router. An app may use its own DoH, a device may use a VPN, and Apple Private Relay also changes the normal DNS path. If you really need to force use of the local resolver, AdGuard alone is not enough; you also need a suitable firewall policy. I deliberately do not do that in this guide because I would rather not complicate a working network just to have a “perfectly sealed” diagram.
Third, aggressive lists sometimes break things. In that situation the biggest advantage of AdGuard Home is not another million rules – it is the Query Log. It shows the domain, the client, and why something was blocked, so I can fix the specific problem instead of disabling half the protection.
How this setup has worked over time
Installing AdGuard Home itself is straightforward. It took more time to reach a configuration that does not need constant adjustment: reduce the upstreams to two, move to DoH, clean up blocklists, shorten Query Log retention, and review old exceptions.
DoubleClick is the best example. At first it looked as though the filters were not working. Checking my own rules showed that I had created the problem myself earlier with the broad exception @@||doubleclick.net^. Once that exception was disabled, the same domain returned 0.0.0.0. That kind of case is more useful to me than another “10 best filter lists” article because it shows exactly where to look when the result is different from what you expected.
If I were setting up AdGuard Home from scratch today, I would do it in this order: a small computer with Ethernet, Raspberry Pi OS Lite, Docker, the minimum required ports, one or two encrypted upstream resolvers, a sensible set of filters, and only then additional exceptions. I would not start with several million rules. First make DNS stable; then tighten it for your own network.
Documentation
- AdGuard Home – Docker
- AdGuard Home – Getting started
- AdGuard Home – Clients
- AdGuard Home – Releases
- Raspberry Pi – Getting started / Raspberry Pi Imager
- Docker Engine – install on Debian
- Quad9 – available resolvers and DoH addresses
- Cloudflare 1.1.1.1 – DNS over HTTPS
- HaGeZi DNS Blocklists
Did this guide help?
If it saved you some time or frustration, you can buy me a coffee.